About packages

When capturing requirements for larger systems, the number of use cases captured can make the task of organising and exploring the use cases overwhelming. It is customary to organise use cases into logically related families of use cases called packages. Use cases are often placed together in a package because they address a common area of functionality, or share a common initiating actor, or even provide the functional sequences that manipulate a particular entity on the database.

Packages in the Use Case Editor

The Use Case Editor arranges use cases in packages in the model hierarchy. In fact, it will not allow you to create a use case unless you have a package to place it in. Hence before you can create and describe use cases, you will have to add at least one package to your model.

How to add a package

For the main menu bar of the Use Case Editor, select Edit | Add package. Alternatively, click the corresponding button in the toolbar as shown in the picture below:

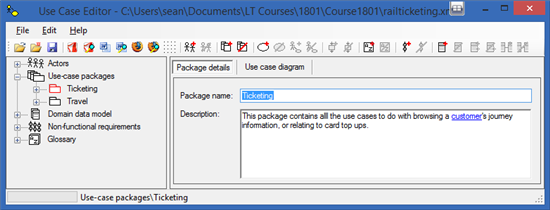
A new package is added to the model, and given a default name of PackageN where N is a number. In the editing panel to the right of the model tree view, change the package name to the desired name, then add a description of the package in the description field beneath. The description should explain the common characteristics of use cases that will be added to this package, thereby explaining the purpose of the package. A screen shot of the editing panel appears below:

There is no 'Save' button to save changes to the model before you navigate to another element in the Use Case Editor. Merely moving the focus from one input element to another causes your changes to be remembered. However, to save changes to the whole model out to a model file or to a version control store, you will need to save the whole model as described elsewhere.

To just explore the existing packages in the model, you use the tree view control at the left of the main window to navigate through the model hierarchy. The node in the tree view labelled 'Use-case packages' is one of the root nodes of the model tree, and is always visible. If you click on it to select it, the node changes colour to red to indicate it has been selected, and a list of packages in the model is shown in a grid on the right hand side, as shown below:

It is also possible to expand the tree view node by clicking on the '+' symbol next to the 'Use-case packages' icon. This will show a list of the package names beneath the 'Use-case packages' node, and change the '+' to a '-'. Subsequently clicking on the '-' will collapse the list of package names again.

To edit a package, you will need to select it from the list of packages currently held in the model. Follow the steps in Viewing Packages above, then either click on a package name in the expanded tree view, or in the grid of packages on the right hand side. This will bring up the packages editing window as shown below:

In the right hand panel, you are now able to change the package name, or edit the package description. Note that changing the package name will cause references to that package name to change elsewhere in the model. For example, use cases will automatically change to reflect the change of the name of the package to which they belong.

Package names must be unique within the model. The tool will not let you create two packages that have the same name.

To delete a package from the model, select it within the tree view first. This will bring up its editing panel on the right hand side of the main window. At this point, you will select Edit | Delete package from the main menu, or click the corresponding button on the toolbar, as indicated in the screenshot below:

A dialog will appear asking you if you are sure you wish to delete this package. It is possible that you have use cases in the package you are trying to delete, so the confirmation dialog is there to warn you that deletion of the package will cause all those use cases to be deleted too. It gives you a chance to change your mind.

After deletion, the tree view will completely refresh, leaving the package tree collapsed. You will have to expand the tree again to navigate to the model item you wish to work on next.