Launching the editor
To launch the Use Case Editor, simply double click its icon on the desktop, or select it from the start menu or from its Windows 8 tile. If you cannot find its tile, on the Windows 8 tiles screen type UCEditor and the appropriate tile should appear for selection.
When the editor starts up, it attempts to reload the previous model you were working on. Hence you will see in the applicaton window that there will be a tree of model elements appearing down the left side of the user interface.
Changing the model path and name
If no model was being edited previously, the editor will launch with a new empty model called newmodel.xml. The path to this new model file will be displayed in the title bar of the application. To change the model name and folder, simply select File | Save As ... from the main menu, and save the model to a new folder location with a new name. Note that the model file must have a .xml extension when saved as a stand-alone model in this way.
Main window layout
The editor when launched without a prior model will look as follows:
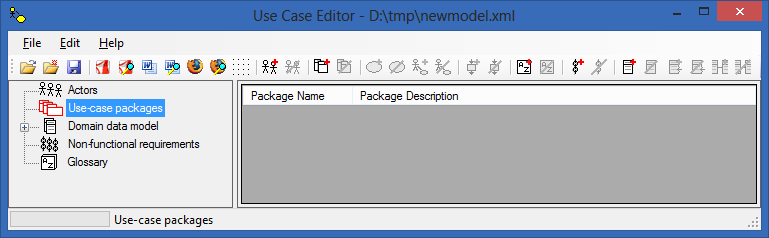
All the model editing functions are available through the main menu drop-downs. For convenience, each of the most frequently used editing functions are available through the toolbar buttons beneath the main menu as well. To find out what each of these toolbar buttons correspond to on the main menu, just hover over them for a tooltip to appear. Editing options not available to you at a particular moment in time are grayed out. As you navigate and add items to the model these additional options will become enabled or grayed as they become valid or invalid for the currently selected location in the model.
Beneath the toolbar, to the left of the main window is a tree view that contains the structure of the requirements model. Initially in an empty model this contains the sections shown in the picture above. The sections are described below.
|
SECTION
|
PURPOSE
|
|
Actors
|
Each actor interacting with the use cases in the system is listed and described beneath this node in the tree.
|
|
Use-case packages
|
All use cases described in the system must be placed into a package. A package is a grouping mechanism for use cases that share some common purpose. Before use cases can be added, at pleast one package must be added beneath the packages section into which those new use cases will be placed.
|
|
Domain data model
|
If a business domain data model is to be added to the requirements model, it is placed beneath this node in the tree.
|
|
Non-functional requirements
|
Constraints and qualities the system is required to observe are listed beneath this node.
|
|
Glossary
|
Definitions of terms and abbreviations are listed beneath this node.
|
The panel to the right of the tree view changes its contents depending on which element in the tree view to the left has been selected. For example, the form that appears on the right hand side is different when editing a use case selected in the tree view, from the form that appears when editing the details of an actor.
Leaving the editor
To quit the editor either select File | Exit from the main menu, or just click on the window close icon at the right of the title bar. If there are outstanding unsaved changes in the model you have been editing, a dialog will appear, telling you of this fact. You will have the opton of returning to the editor, or quitting the editor, losing any unsaved changes.